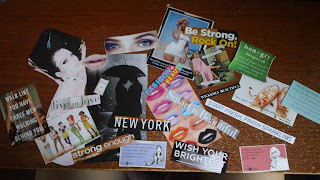
So today, I am showing you a really cool DIY that really organizes but also display your bracelets and necklaces in an chic way. Most of the products used in this DIY is about $10 or less, depending on where you get it and what materials you wanted for this. So lets get started!!
Materials needed:
-Picture frame,any size(I used 8x11 old,vintage picture frame) ($3)
-Some old magazines, or print out some cool pictures
-Cardboard,preferably thick(cut to fit into frame)
-Gluestick ($1)
-Mini hanging hooks(I used tacks) ($1 for pack of 30 tacks)
-Scissors ($1)
-Ruler
-Marker/pencil
-Decorations: ribbons, jewels,stickers,gems,etc.(optional)
1) Take out the glass and covering of the frame and put it aside or toss it away.
2) Take some old magazines or look online for some cool pictures, be it inspirational, pretty, beauty, fashion, cute, quotes, etc. and take the pages out/print them.
 |
| Some of my favorite magazines |
 |
| Some cool magazine pages |
4) On your cut out cardboard,sized and fitted to the picture frame, lay out each magazine/picture on the cardboard. DO NOT GLUE until you know that your completely satisfied with the results.
 |
| Top,up close |
 |
| Bottom, up close |
6) Place the cardboard with all the clippings,glued, back onto the frame and enclose it like so in the picture.
7) Then start measuring where to attach the hooks onto the display and dot it with a marker/pencil(if you decide to use the self-adhesive hooks,you can use the glass that came along with the frame). I measured mine about 2 inches in between each hook,horizontally, and about 4 inches below the first hook,vertical-wise. Attach the hooks, if your using tacks, make sure to leave at least a 1/4-1/2 cm like so below to allow the jewelry to hang.
 |
| See the black dots? Marking :) |
 |
| Leave 1/4 - 1/2 cm to allow jewelry to hang :) |
8) Decorate with any of materials you wanna add on to the frame to your liking, like adding sparkles, stick-on gems, stickers, spray painting, etc. I like to keep mine simple so I just left it alone.
9) Place on the jewelry on the hooks and adjust anything that seems out of place.
10) Place it on your wall and ta-da! A DIY photo frame jewelry display, all about $10 or less!
I really hope you like this jewelry display and send me pictures of your take on this DIY!! Thanks so much!
See you next time! Bye!


